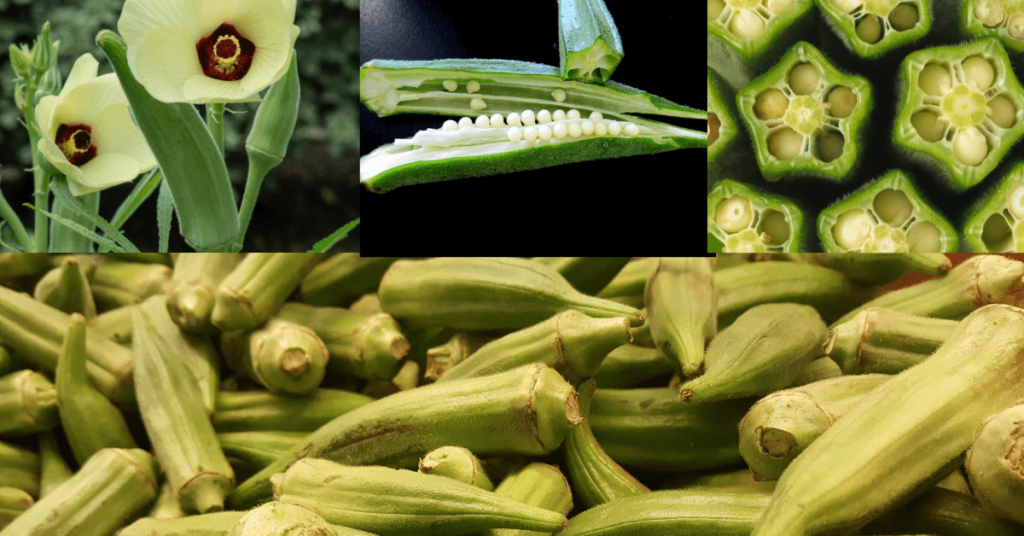
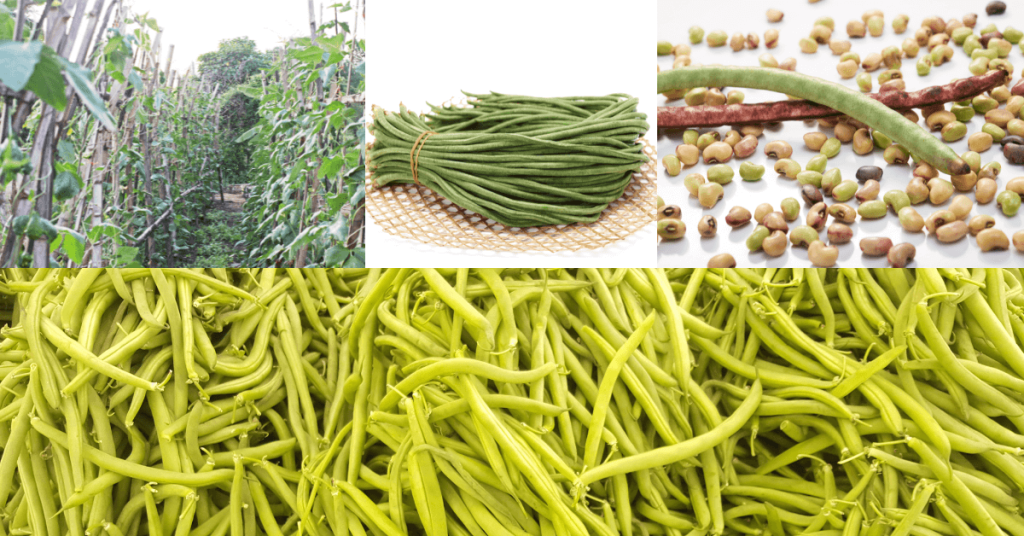
6 Benefits to Saving Your Own Seeds

โ€œDonโ€™t put that in your mouth! You donโ€™t know where itโ€™s been!โ€ said every parent ever.

Plants today are fumigated, grown in overly fertilized soils, and go through all sorts of processes that we unknowingly agree to when we put that food in our mouth.ย 

When you save your own seed, you know exactly how that seed was grown. So thereโ€™s no mystery as to what youโ€™re putting in your mouth. You do know where itโ€™s been!

Seed adapts more and more to your local growing conditions through their generations. Over time, future generations of those plants will be more tolerant of your temperatures, precipitation levels, and other local conditions. If Stephen Hawking is right that โ€œintelligence is the ability to adapt to change,โ€ it would seem that seeds may have a higher collective IQ than humans. As they say, โ€œWhat doesnโ€™t kill you makes you stronger!โ€

There is a direct link between the flavor of food and the nutrition it contains. Constantly consuming the same humdrum varieties of mass-produced, uniform, flavorless food can have a big impact on your long-term health. Boring food may not kill you, but the absence of proper nutrition will definitely not make you stronger.

And supposedly, only the strongest make itโ€”survival of the fittest and all.

By saving seed, you are ensuring the survival of humans and tens of thousands of seed varieties. There are “aspects of life that are valuable to our survival” and “aspects that make survival valuable.” Seed saving is both. Big agriculture disregards variety because it doesnโ€™t fit into a cookie cutter box of traits that make their job easier.

Seed saving gives you access to literally thousands of new food varieties, all with their own unique colors, textures, and flavors. Since you are what you eat, you need to ask yourself: Are you eating the same cookie cutter, uniform foods over and over again? If so, itโ€™s not a good look. When you save your own seeds, youโ€™re creating abundance that you cannot buy with money.

But the abundance can buy money because in fact people, money actually does grow on treesโ€ฆand annuals, perennial shrubs, and biennials. Ask any gardener or farmer that has ever lived. The abundance of variety also means unique offerings to share with neighbors and market, if youโ€™re a small-scale grower.

A seed saved is potentially hundreds of thousands of seeds earned. A single amaranth seed grows into a plant that can produce up to 250,000 seeds. Now thatโ€™s what you call an investment!

While there are a ton of benefits to seed saving, it isnโ€™t all rainbows and butterflies. Sometimes, you save seed and donโ€™t get what you expect, or none of the seed you save germinates. It happens. But you know what they say: It’s better to have saved seed and lost than to have never seed saved at all!

Are you interested in learning more about seed saving? If so, check out Crystal Meserole’s Seeds Micro Course HERE.

Crystal Meserole, GYOV Instructor

Crystal Meserole

Crystal owns and operates a one-woman wholesale commercial microgreen operation in the mountains of western North Carolina. After working and managing local restaurants for over a decade, she saw the need for chefs to have access to more affordable, organic food for the delicious creations they craft for our communities.

Crystal hopes to stand as a clear message to anyone who thinks they canโ€™t grow: You can. Anyone can. With the right system, mindsets, and mentor, everything becomes possible!ย 

Have a seed saving benefit or perspective you want to share? Post it in the comments belowโ€ฆ bonus points if it comes along with a quote or play on words! ๐Ÿ™‚

3 Mistakes Beginners Make Saving Seedsโ€”And What to Do Instead

Saving seeds is rewarding on so many levels. Itโ€™s not just about the end result of getting viable seed. Itโ€™s not even just about the harvest you get from that seed next season. In fact, itโ€™s not about any one thing.ย 

Saving your own seeds is about the entire journeyโ€”from the moment you hold that tiny fleck of life on the tip of your finger, all the way through that plantโ€™s life, to that special moment when you are holding the next generation of seeds in your palm. This experience gives seed savers a special relationship to plants and the food that they provide us.

When you first start out on your seed saving journey, however, it doesnโ€™t always feel this magical. If you make these three mistakes, youโ€™ll end up disappointed, like someone just took your birthday cake. ๐ŸŽ‚

Saving Seeds Mistake #1: Trying to Save & Breed Hybrid Seeds

Hybrid seeds are the result of two open pollinated varieties of the same species mixing. When this happens, the seed is either sterile or a weird mutant plant that makes you feel like your life took a turn into a sci-fi alien movie. ๐Ÿ‘ฝ

Seed savers avoid hybrids because they do not produce relatively stable outcomes. A hybrid can be stabilized over time and become a true-to-type variety, but this process takes many years of growing, selecting, and saving seed. Thereโ€™s no guarantee that youโ€™re going to get what youโ€™re aiming for.

Saving Seeds Mistake #2: Planting Different Varieties From the Same Species Too Close Together

Plants grown from open pollinated seed can still cross-pollinate with other varieties. When this happens, you get the same weird and unpredictable results as you do when you try to save the seed of hybrids that happen to be fertile: you never know what youโ€™re going to get. Basically, these are naturally bred hybrid seeds.

To save seed and get the same variety next year with relatively stable traits, you want to plant only one variety of each species within the space that variety pollinates. This is called the โ€œisolation distance,โ€ and all crops are different.ย 

For example, lettuce only pollinates at a distance of approximately 20 feet. This makes it easier for most home growers with medium-sized gardens to save seeds.

However, the species Brassica oleracea (brussels sprouts, cabbage, broccoli, kale, etc.) is another story. Members of this species can cross pollinate if theyโ€™re within half a mile of each other. So you only want to grow one of these species, if youโ€™re planning to save the seeds. You also want to find out if anyone else within a half mile radius is growing anything from this species!

If youโ€™re a home gardener and still want a variety of food and to save your seed, there are other options besides buying a piece of land miles wide. Connect with your community of seed savers and growers and exchange food and seed. You grow the brussels sprouts and let your friends grow the others. This way, you can maximize your garden space, get a variety of food in your diet, and still save your seed.

Saving Seeds Mistake #3: Not Planting Enough of the Same Variety

If you donโ€™t plant enough plants of a variety when youโ€™re saving seeds, the result is gene bottlenecking and a deterioration in the genetic stability of the traits of that variety. The most common way to recognize this phenomenon is if you notice that your next generation of seeds just arenโ€™t producing as vigorously as previous generations.

To preserve genetic diversity in that variety, you have to do one of two things:

1. Grow enough plants to preserve genetic diversity long term.ย 

How many plants is enough? Well, that depends on the variety.ย 

For some varieties, itโ€™s only a few plants. Beans (Phaseolus vulgaris) only require 20 plants minimum for long term genetic preservation. They are planted between 2-6โ€ apart, depending on the variety. โ€จโ€จ

For corn, you need more than 200 plants! Each corn plant needs a lot of space to grow. Unless youโ€™re a farmer, itโ€™s a little unrealistic.ย 

If saving a seed is out of reach for you because that crop needs too many plants per season to preserve the genetics, then go for option number two below.โ€จ

2. Reintroduce new genetic material every so often.ย 

If youโ€™re growing Glass Gem heirloom corn and you can’t plant 200 plants, plant what you can and save those seeds. Then, ever so often, buy a packet of Glass Gem heirloom corn from Rareseeds.com or get some from the local free seed exchange. Plant these seeds in with the saved seed you have. This can help preserve the genetics of that variety.

When you first start out on your seed saving journey, itโ€™s best to start out with self-pollinating plants. These plants generally donโ€™t need a ton of plants to preserve long-term diversity, and they usually have shorter pollination distances, like the lettuce in Mistake #2.

When it comes to saving seed, youโ€™re going to have much more success if you plant enough plants, follow proper pollination distances, avoid aliens, and stick to those open pollinated seed varieties.

Crystal Meserole
GYOV Instructor and Harvest Club Support

Crystal owns and operates a one-woman wholesale commercial living microgreen operation in the mountains of western North Carolina. After working and managing local restaurants for over a decade, she saw the need for chefs to have access to more affordable, organic food for the delicious creations they craft for our communities.

Crystal hopes to stand as a clear message to anyone who thinks they canโ€™t grow: You can. Anyone can. With the right system, mindsets, and mentor, everything becomes possible.ย ย 

Have seed saving tips? Share them in the comment section below!

Your 7 Step Food Preservation System

Turn your garden harvests into meals!

GYOV founder Stacey Murphy developed our Harvest-into-Meals food preservation system that gives you strategies for eating fresh year-round, whether it’s out of your garden or from the farmer’s market.

Having a food preservation system helps you:

  • โ€ข Manage the harvest you have coming in without overwhelm or waste

  • โ€ข Enjoy garden-fresh nutrition year round

  • โ€ข Take the guesswork out of meal planning

  • โ€ข Plan to preserve your favorite staple foods

  • โ€ข Open up time and energy to enjoy other activities

Like any new skill, learning to manage harvest takes time and energy upfront. But as you incorporate a food preservation system into your routine, it becomes second nature with time.

>>> Want to learn about your food preservation options? Check out our โ€œ5 Methods to Preserve Vegetables at Homeโ€ blog post.

Step 1: Set food preservation goals

The first step in creating a food preservation system that works for you is setting goals. Goals that work for you and your lifestyle are all aboutโ€ฆYOU! So put away those โ€œshouldsโ€ and focus on what you actually want.

The best kind of goals create habits, especially if it’s a daily habit or a weekly habit. Habits make accomplishing your goals automatic, just like brushing your teeth.

Be realistic about your time and energy

Whatever kind of garden space, time, and energy levels youโ€™re working with, be realistic about what kind of food preservation system will work for your lifestyle. If you have a busy life with lots of priorities, your plan should be enjoyable and easy to execute in the time you have. If your time is flexible and youโ€™re looking to take on a new project, be realistic about how much you can take on at once without burning out.

Set a variety of goals

  • โ€ข Set some small goals that you know you can accomplish (ex: I want to learn how to lacto-ferment vegetables). Easy wins create momentum!

  • โ€ข Set some stretch goals so that if you manage the small goals, you have something to stretch for (ex: I want to lacto-ferment 20 quarts of sauerkraut from my own cabbage).

  • โ€ข Differentiate between rate-based goals (ex: I want to can two quarts of tomatoes per week) and overall goals (ex: I want to can all of the pasta sauce I need for a year).

Set Questions for reflection

How many hours per week can you commit to preparing and preserving food?

  • โ€ข Do you have friends or family who can help with prep work?

  • โ€ข What materials or supplies do you need to get started?

  • โ€ข What kind of preserved food excites you?

  • โ€ข In your garden, do you want to grow food specifically for preservation? Or do you want to grow easy foods you enjoy and figure out how to preserve them later?

Step 2: Quantify your goals

After youโ€™ve set realistic goals for your food preservation system that align with your values and lifestyle, itโ€™s time to do the math. If you plan to grow vegetables in your garden specifically for preservation, this step is crucial for your crop plan.

For example, if your overall goal is to grow and preserve all of your own tomatoes for pasta sauce for a year, you need to figure out:

  • โ€ข How much pasta sauce you eat in a year (in quart jars)

  • โ€ข How many tomatoes it will take to make that much pasta sauce

  • โ€ข How many tomato plants you need to grow that many tomatoes (tip: overestimate here to account for loss)

Itโ€™s okay to estimate in the beginning! Youโ€™ll use what you learn this year to create a more specific plan next year.

Step 3: Track your garden harvests

The third step of your Harvest-into-Meals food preservation system is to create or adjust your crop plan for the next growing season so that you’re growing for preservation. To do that effectively, youโ€™ll need to create a harvest log.

Keep a harvest log

A harvest log is a list of crops youโ€™re growng. Every time you harvest, you note the amount of each crop by weight or by bunch. This empirical data comes straight from your garden and gives you a clear picture of how much harvest you can expect from your plants and your space. Start simple with one or two of your staple crops.

Harvest once a week & batch tasks

Make it a weekly event: harvest your produce, log your harvest, and plan what to do with it. You can see everything that’s available for the week (see Step 4) and create your meal plan (see Step 5) in just a couple of hours.

A note for the farmerโ€™s market

Even if you donโ€™t have your own garden, you can note when different crops become available at the farmerโ€™s market. And look for sales. For example, at the end of a tomato season, farmers may have discounted boxes of tomatoes perfect for preservation.

Step 4: Divide up your harvest

You want to use or preserve all of your harvest each week. Naturally, some may end up in the compost bin, but dividing up your harvest will help you reduce waste.

What you preserve:

First, separate out all of the best-looking produce. That’s what you’re going to preserve! When you preserve food, it has to be blemish-free. Blemishes increase nutrient loss and can introduce bad bacteria.

What you eat:

Those tomatoes with blemishes? Those are what youโ€™re going to cook or eat raw this week! Just cut away bad sections and incorporate the good bits into your meal plan for the week.

What you compost:

If anything is blemished and damaged beyond edibility, or if it has mold growing on it, that goes into the compost. When you compost, yucky vegetables go back into your garden as nutrients.

Donโ€™t have a compost bin yet? Toss food scraps outside instead of putting them in the trash. Food scraps donโ€™t biodegrade in landfillsโ€“but they do contribute to methane emissions and climate change.

Using scraps:

You might want to keep certain food scraps and do something with them. You can make apple cider vinegar out of apple cores and peels. As long as they look good and arenโ€™t moldy, you can also cook vegetable scraps into stock for soups.

Step 5: Plan meals for the week

Could you commit two hours to meal prep each week? This little bit of structure could lead to lots of creativity. Plus, strategically planning your meals ahead saves you time and energy in the long run.

If you can successfully plan one week of meals at a time, you can conquer the whole year.
-Stacey Murphy

Questions for reflection:

  • โ€ข What does a well rounded meal look like for you?

  • โ€ข What do you eat when you are in a hurry?

  • โ€ข How many meals are you eating on the run?

  • โ€ข How can your loved ones help?

Step 6: Preserve according to your goals

Step six is the preservation step, so you’re going to spend some time here. This is where you take all the planning that you’ve done and you actually do each process.

>>> Need some ideas? Check outโ€ฆ

Step 7: Create a preservation log

Then the seventh step in your preservation system is to create a preservation log. A good preservation log is going to tell you:

  • โ€ข What you preserved and when

  • โ€ข How much you have on hand vs what you already ate

  • โ€ข Progress on your rate-based goals

The most important goal of your preservation system is to make everything visible. Things disappear quickly in the back of your refrigerator or shelves, and you forget about them.

Ideas for keeping your preserved items visible

  • โ€ข Keep a dry erase board on your fridge for reminders

  • โ€ข We read left to right, so orient your โ€œeat byโ€ food dates left to right

  • โ€ข Add drawers and label lids

  • โ€ข Tiered shelving

Your log might be your pantry itself, where you just have everything labeled very clearly. Or you might want to create a paper log or a digital log. However you track so that you can follow along. You can improve your system for next year so that you can reset your goals.

Letโ€™s do this!

Learning to preserve your own food can be a big project or just a few simple stepsโ€“it all depends on your lifestyle! Either way, having a food preservation system in place will simplify your process and turn new skills into lifelong habits.

Share your biggest take-a-ways from your preservation log!

The Top 3 Mistakes Growers Make When Growing Seedlings

Growing seedlings unlocks the door to thousands of plant varieties, all with their own unique flavors that you canโ€™t find at grocery stores or nurseries.

It can also save you moneyโ€ฆ if you grow the seedlings correctly. But when youโ€™re first starting out, itโ€™s easy to make mistakes. And those mistakes can end up costing you more money and time, leaving you frustrated and wishing youโ€™d just purchased the same olโ€™ hum drum varieties.

To help you grow healthy, robust seedlings, here are the top three mistakes new growers make when growing transplants.

Growing Seedlings Mistake # 1: No Substrate Nutrients

Seedlings donโ€™t need nutrients to get their first few leaves out. But once those leaves emerge, seedlings need nourishment from their surroundings. Quite often, new growers fail at growing seedlings not because they donโ€™t know that transplants need nutrients, but because they arenโ€™t aware that their substrate doesnโ€™t contain any.

The most common way this happens is with peat moss and coco coir. New growers will buy coco coir pods, for example, and plant in them expecting the seedlings to grow healthy.

But the reality is that coco coir and peat moss do not have ANY level of substantial nutrients for your transplants. If you use these substrates without adding a complete liquid nutrient profile, the seedlings arenโ€™t going to make it.

Ideally, you would use an organic seedling mix with compost and worm castings. Whether you make your own seedling mix or buy one pre-made, make sure it has the nutrients your plants need to get a healthy start.

Growing Seedlings Mistake # 2: Not Enough Light

Once your seedlings germinate, they need light. Unless youโ€™re growing in a greenhouse that gets plenty of sunlight year round, you want to supplement with full spectrum plant lights. Newly germinated seeds need 16-18 hours of artificial lighting!

Itโ€™s best to purchase grow lights from a company that specializes in agricultural lighting. With the popularization of LED lighting and cannabis growing, the plant light industry has exploded. As demand rises, there always emerges a subpar industry that wants to profit but doesnโ€™t want to produce the quality. So lighting companies that specialize in garage and bathroom lighting, or nightclub and office lighting, are now selling LED lights as agricultural lighting. The problem is that their technology is often of lesser quality than companies who specialize in agricultural lighting.

Growing Seedlings Mistake # 3: Over or Under Watering

Watering plants is a challenging skill to master, and growing seedlings is no different! When growers first start growing transplants, theyโ€™ll either lean towards over or under watering. Avoid water extremes by practicing the following moisture tips:

Be sure you hydrate your substrate before you plant your seeds. For a starting place to gauge proper substrate hydration levels, pick up a handful of your substrate and squeeze. A few drops of water should fall out. If no water droplets fall, your substrate may be too dry. If a ton of water falls, your substrate is too wet. New growers (especially busy ones!) are often tempted to skip this step. If you do, the substrate can actually pull water from your seeds, not provide water to them.

If you find yourself low on time, you can still accomplish your task without cutting corners. Dump your seedling mix in a tub, and add some water. Put the lid on and walk away, letting the mix absorb the water while you do other tasks. After a few hours, check on the mix and stir it. Do the squeeze test. Repeat until you have the desired moisture level. This process takes much less time, and youโ€™ll often get more moisture consistency throughout the mix than if you try to work the moisture evenly into the media by hand.ย ย 

Making sure your seedlings have nutrients, enough light, and adequate water will help ensure your transplants are healthy and robust. And once you get the hang of growing your own seedlings, youโ€™ll gain access to thousands of exciting varieties you canโ€™t find anywhere else.

Crystal Meserole
GYOV Instructor and Harvest Club Support

Crystal owns and operates a one-woman wholesale commercial living microgreen operation in the mountains of western North Carolina. After working and managing local restaurants for over a decade, she saw the need for chefs to have access to more affordable, organic food for the delicious creations they craft for our communities.

Crystal hopes to stand as a clear message to anyone who thinks they canโ€™t grow: You can. Anyone can. With the right system, mindsets, and mentor, everything becomes possible.ย ย 

5 Methods to Preserve Vegetables at Home

Itโ€™s easier than you think to preserve vegetables at home.ย 

When it comes to preserving food, many of us think of Granny canning tomatoes late into the night. But there are lots of other options! Whatever kind of experience, space, and tools you have, you can preserve your garden harvests, as well as fruits and vegetables you pick up at your local farmerโ€™s market or grocery store.

Harvesting & Storing for Preservation

To make sure your preserved vegetables are safe, delicious, and packed with nutrients, it starts with how you harvest and store them.

Use the freshest produce possible. Vegetable texture and nutrition begin to degrade within just a few hours of harvest, so going directly from harvest into canning is best. Using the farmerโ€™s market? Make a plan to preserve your haul the day you shop.ย 

Use fruits and vegetables that do not have blemishes. Use those fresh in salads or cook them up that week.ย 

Some vegetables like garlic, onions, winter squash, and sweet potatoes need to be cured before storage. But if you harvest and cure them correctly, many can store for months on end. These cold weather staples become hearty winter soup for a reason. If your goal is to grow food for yourself for the entire year, consider adding some of these to your crop plan.ย 

Dehydrating

Properly dehydrated food is the closest thing to raw in terms of nutrients.ย 

Dehydrating preserves vegetable enzymes. Enzymes are most susceptible to damage when food is wet, and they can withstand drying temperatures up to 140ยบF (60ยบC). Once most of the moisture is removed, enzymes become stable and dormant until re-hydrated in your gut or in a recipe.

To dehydrate your veggies, you can use your oven, purchase a food dehydrator appliance, or build your own solar dehydrator (like Tom Bartels uses to preserve his abundance of kale!). There are lots of options based on your budget, space, and DIY skills, so a bit of research will help you find or create a food dehydrating system that fits your needs.ย 

Tips to preserve vegetables at home by dehydrating:

โ€ข Air circulation is key! Moving air prohibits microbial growth. Spread your food in a single layer with a little room to โ€œbreathe,โ€ and keep that breeze blowing throughout the dehydration process.
โ€ข Keep it even: Consistently slice your veggies so they dry at the same rate. Remember that edges always dry faster than the center, and note that the back of your dehydrator may become warmer faster. For an even batch, keep an eye on your veggies and rotate them.
โ€ข Get that moisture out! Sometimes, itโ€™s hard to tell if something is completely dehydrated. When in doubt, put it in an airtight container overnight. If there is fog in the container or the food is softer the next day, either there was humidity in the container to begin with or the food was not totally dehydrated.ย 

Freezing Vegetables

Almost everything that comes out of your garden can be frozen! Freezing is a quick and accessible way to preserve vegetables at home, even in small amounts.ย 

There are only five vegetables that don’t like to be frozen: Radish, cucumber, lettuce, cabbage, and celery. They lose their flavor and texture. For every other vegetable, there’s a way to make sure that you retain everything that makes it delicious.

You can chop and directly freeze peppers, onions, and mushrooms.ย 

Other vegetables require blanching before you freeze them. โ€œBlanchingโ€ is just a fancy name for heating your veggies in boiling water for a certain amount of time, then quenching those vegetables in an ice bath for the same amount of time. Blanching times are different for different crops, so look it up before you get started.

Benefits of freezing your veggies:ย 

โ€ข Freezing takes less time than drying, canning, and fermenting.
โ€ข You can preserve the texture of that vegetable, as well as the flavor and nutrient profile.
โ€ข Chopping and freezing a whole bunch of your harvest all at once can reduce prep for future meals.
โ€ข You control the size you cut your veggies and the size of the portion. Create little serving size packets in your freezer so that you just pull out what you need for each meal.
โ€ข Did you know you can freeze tomatoes, and they store for at least 3-4 months? Freezing is a fast method to preserve all those tomatoes.
โ€ข Freezing involves simple procedures that you can do with household items.

Why you may not want to freeze your harvest:ย 

โ€ข You have to have freezer space and the power to keep the freezer cold. If you have a big family, you might not have enough freezer space to store all that garden harvest.
โ€ข If you freeze your vegetables incorrectly, you can actually speed up the loss of texture, flavor, and nutrients and make your food really unappetizing.

Lacto-Fermentationย 

Lacto-fermentation happens when friendly bacteria, called lactobacili, convert the natural sugars in your vegetables and fruits into lactic acid. The proliferation of lactobacilli in your fermented vegetables enhances their digestibility and the bioavailability of their nutrients.

Which vegetables can you lacto-ferment? Basically all of them. It’s just a matter of taste. The flavor of leafy greens, for example, can become very strong in the fermentation process. โ€œTougherโ€ vegetables also hold up better through fermentation and storage. The more fibrous the cell wall, the longer they’re going to last.ย 

You can get started with lacto-fermentation using items you most likely already have in your kitchen, like glass jars. There is special equipment you can purchase that can make your life a little easier, like fermentation crocks, seals for jars, and weights specifically designed for fermentation.ย 

Benefits of lacto-fermentation:ย 

โ€ข The biggest benefit of lacto-fermentation is for your health. Lacto-fermented foods are not only preservedโ€“-they are nutrient dense, enzyme rich, and chock-full of probiotics.
โ€ข Store-bought fermented foods are expensive, so you’re going to save a lot of money fermenting your own.
โ€ข Lacto-fermentation is a simple and fast way to process lots of your harvest. A quick wash and chop will get your ferment started, and then it’s just a waiting game.
โ€ข Fermentation is a fun science experiment and learning experience for all ages!

Disadvantages of lacto-fermentation:

โ€ข Lacto-fermentation is vulnerable to contamination, so it definitely requires monitoring.
โ€ข Full fermentation can take up to eight weeks.
โ€ข Some people find a disadvantage in that lacto-fermentation requires salt.

Water Bath Canning:

Water bath canning is for highly acidic foods that have a pH of 4.6 or lower. Many unwanted bacteria, including botulism, cannot survive at such a low pH. That list of high-acid foods includes fruits, pickles, sauerkraut, jams, salsas, and hot sauces. Tomatoes are close enough, too, as long as you add a little extra acidity.

There are two types of water bath canning:ย 

1. Raw packing. Take your raw fruits or vegetables, put them in the jars, and then pour some sort of brine or sugar fluid over the top. The advantage to raw packing is that itโ€™s easy and saves time. The disadvantage is that not as much gets preserved per jar, so you can eat up shelf space quickly. There will be a lot of extra space in each jar, so youโ€™ll need to use a lot of fluid.ย 

2. Hot packing. With hot packing, you pre-cook a recipe and put that into the jars. This process reduces the air inside of the jar and it improves the quality of the product. It does take a little extra time to pre-cook the recipe, but hot packing maximizes jar space.ย 

There are three ways to kill off unwanted bacteria in the canning process: heat, sugar, natural acids, or a combination of them. Following your canning recipe closely ensures the food youโ€™re preserving is safe.ย 

One disadvantage of water bath canning is that it is fairly time consuming to heat up a lot of water and do all the cleaning necessary for the process. If possible, make a day of it, and can a lot of things all at once.ย ย ย 

Pressure Canning:ย 

For fruits and vegetables that have a pH greater than 4.6, pressure canning utilizes pressurized steam to heat water above its boiling point (212 ยฐF). Low acid foods must be canned at 240 ยฐF or higher and held there for the time specified in the recipe in order to destroy unwanted bacteria.

Pressurized steam creates superheated temperatures, hotter than boiling water. The rest is the same as water bath canning. As the jars cool down, a vacuum is formed, and it seals the food into the jars and prevents any new microorganisms from entering, which could spoil the food.ย ย 

There are two types of pressure canners: weighted gauge and dial gauge. If youโ€™re purchasing a new pressure canner, make sure to do your research and find one that fits your needs. Understanding how to use and maintain your pressure canner is crucial for safe canning.ย 

Pressure canning safety:ย 

โ€ข Wash, rinse, and dry canner to remove all the foreign matter after each use.
โ€ข Prevent odors from forming in the canner by thoroughly airing it.
โ€ข Store the can in a dry place to prevent rust.
โ€ข Do not use your pressure cooker to pressure can. A pressure canner is considered a pressure canner if it holds a minimum of four quart jars. Most pressure cookers cannot. The recipes that are in the USDA guidelines for canning are based on empirical data from things that have been tested. And what’s been tested are pressure canners that hold at least a minimum of four quart jars.
โ€ข Don’t add grains, bread, noodles, eggs, thickeners, package mixes, avocado, or coconut milk.ย 

Some fruits and vegetables don’t can well. Eggplant, celery, brussel sprouts, broccoli, cauliflower, artichokes, and zucchini get really mushy, and you’re not going to enjoy the results of pressure canning those vegetables.ย 

Letโ€™s do this!

Want to learn more about how you can preserve vegetables at home in a way that fits your lifestyle? Check out our Preserve the Harvest course here!

Share your favorite method of preserving your harvest!

Vegetable Crops for Hot Weather Gardening

Hot Weather Crops for Your Garden

Choosing hot weather crops

The first key to success with hot weather gardening is choosing crops that are well-adapted to heat.

Summer crops like tomatoes, cucumbers, and melons all fare well in heat and humidity. But if temperatures climb above 90 and stay there, production will slow significantly.

The hot weather crops on this list originated from tropical or subtropical climates, and several of them have been staples in these areas for thousands of years. They have the genes to take the heat! Each crop comes in many varieties, and each variety has its own unique set of climate adaptations.

Notes on temperatures

Air temperatures are listed below. Soil temperature differs from air temperature and has just as much (if not more) impact on your plants. Research your specific cultivars for their soil and air temperature needs.

Temperature profiles for each crop include โ€œlow,โ€ โ€œgrows,โ€ and โ€œslowsโ€ averages. Individual cultivars vary.

Low: At or below this temperature, your hot weather crops will stop producing and may suffer long term damage.

Grows: These are the ideal temperatures for growth and production

Slows: When air temperatures climb this high, your plantsโ€™ production will slow. Note that they will survive beyond the โ€œslowsโ€ high temperatures. They just wonโ€™t grow or produce optimally.

Okra

Temperature Profile

Low: <55ยฐF at nightย 
Grows: 75-90ยฐF
Slows: >95ยฐFย 

Okra was cultivated by ancient Egyptians and is an important crop in tropical and subtropical climates worldwide. In West Africa, for example, the leaves, flowers, seeds, and buds serve an impressive variety of functions, from paper pulp to coffee additive. In the American South, fried okra is a popular side dish that traces its roots to the transatlantic slave route ingenuity of West African women, who braided its seeds into their hair before they were captured and enslaved.

At their peak, okra plants have an other-worldly vibe with distinct leaves, gorgeous flowers, and pleated seed pods.

Okra gets bigโ€“up to 8 feet tall and 5 feet wide. Because of its size, okra casts quite a shadow and is great to interplant with less heat-tolerant vegetables.

The seed pods grow quickly and become tougher the bigger they get. Itโ€™s best to harvest the seed pods frequently when theyโ€™re about 4 inches long. You can cook them fresh or freeze them, and they pack an impressive nutritional punch.

Growth and production slow above 95ยฐF. When you regularly see >95ยฐF days, prune okra plants down to about 2 feet tall for a bumper crop later in the season. You can also prune them anytime they start growing too tall for you to reach!ย 

Sweet Potatoes

Temperature Profile

Low: <50ยฐF
Grows: 85-95ยฐF
Slows: >100ยฐF

Sweet potatoes are one of our favorite hot weather crops, butโ€ฆtheyโ€™re not actually potatoes! Potatoes are tubers that like temperatures at or below 80ยฐF, and sweet potatoes are tuberous root vegetables perfect for hot weather gardening.

Sweet potato plants produce vigorous vines that quickly spill out into your garden, so make sure you give them plenty of space or a trellis. The leaves are also edible raw or cooked, so you can get your greens in while you wait to harvest the tuberous roots ๐Ÿ™‚

You can store raw sweet potatoes for several months in a cool, dark place with good ventilation. Frozen, cooked sweet potatoes are good for six months.

Growth can slow over 100ยฐF, but your sweet potatoes will stay healthy even in that heat if you keep them watered.

Malabar Spinach

Temperature Profile

Low: <50ยฐF
Grows: 75-85ยฐF
Slows: >95ยฐF

You wonโ€™t have seen this one at the grocery store yet, but Malabar Spinach is gaining popularity as a great green for hot weather gardening. Most leafy veggies canโ€™t take the heat, but this one sure can.

Malabar Spinach is a vine that can grow six feet or longer. Trellising helps, as does frequent harvest! You can grow Malabar Spinach in full sun or partial shade. The leaves become particularly big and juicy when they get some shade.

You can cook Malabar Spinach or add it to salads just like common spinach. Keep your plants well-watered so the laves donโ€™t become bitter.

Growth slows above 95ยฐF, but making sure your Malabar Spinach has plenty of water and a little shade will keep your plants happy until temperatures cool down.

Hot Peppers

Temperature Profile

Low: <50ยฐF
Grows: 70-90ยฐF
Slows: >95ยฐF

Hot peppers might seem like a no-brainer for hot weather gardening, but just how hot can they handle?

Just like tomatoes, peppers experience blossom drop if temperatures get too hot. Bell peppers are less tolerant of heat than hot peppers. Among hot peppers, temperature tolerance of individual varieties and cultivars. A good rule of thumb is the hotter the pepper, the more heat it can handle.

Make sure your pepper plants get plenty of water. If temperatures regularly top 95ยฐF, pay attention to them. If you start to see blossoms drop, give them some shade. Experiment with different varieties and cultivars to see which hot peppers thrive best in your climate.

Cowpeas

Temperature Profile

Low: <60ยฐF
Grows: 70-95ยฐF
Slows: >95ยฐF

The term โ€œcowpeaโ€ includes a wide variety of cultivars with all sorts of textures and flavors, from black-eyed peas to lima beans. Like Okra, cowpeas or โ€œsouthern peasโ€ originated in West Africa and are an important crop in tropical and subtropical climates.

Cowpeas are a legume, so they are actually beans, not peas. Like other legumes, cowpeas fix nitrogen and build soil. They can be a cover crop and green manure, as well as forage for livestock. Rotating cowpeas through your garden beds will increase the production of other vegetables as well.

If you live in an arid, hot climate, cowpeas are a great option! They are the most drought-tolerant crop on our list, and they continue producing even under harsh conditions. In very dry climates, you may need to provide some water when they flower. Otherwise, irrigation may not be necessary, and itโ€™s important to avoid overwatering.

You can eat cowpeas fresh or leave them on the vine to dry for long term storage.

Letโ€™s do this!

Hot weather gardening is about learning to work with the conditions you have. You canโ€™t change the weather, but by selecting plants that grow well in your conditions, you set yourself up for success with less heartache and less work.


Amy Davis
Wordsmith and Client Support

In an age of increasing specialization, Amy proudly calls herself a generalist. She holds a Masterโ€™s degree in English, a RYT 200 yoga teacher certification, and is working her way through a bachelorโ€™s in Biology. She believes in nurturing and following curiosity, then taking what youโ€™ve learned and sharing it to better the lives of others.

Amy is an avid chaos gardener and has worked in agriculture for several years. In 2017, she first apprenticed on a Certified Organic vegetable farm and later took over as operations manager there. She also served as greenhouse manager for a local restaurantโ€™s urban farm, and she spent a year in AmeriCorps service to an agriculture nonprofit specializing in education for beginning farmers and gardeners. She has a passion for greenhouse work, and she loves watching tiny little seedlings grow and turn into lunch. Amy and her husband grow an ever-evolving front yard garden in southern Appalachia (apple-atcha).ย ย 


References

Albert, S. (2022, June 9). How to plant, grow, and harvest sweet potatoes. Harvest to Table. Retrieved August 15, 2022, from https://harvesttotable.com/how_to_grow_sweet_potatoes/

Anderson, C. R. (n.d.). Southern peas. University of Arkansas Division of Agriculture.

Anderson, M. (n.d.). Pepper. Aggie Horticulture. Retrieved August 15, 2022, from https://aggie-horticulture.tamu.edu/archives/parsons/vegetables/pepper.html#:~:text=A

Fern, K. (n.d.). Basella alba. Useful Tropical Plants Database. Retrieved August 15, 2022, from http://tropical.theferns.info/viewtropical.php?id=Basella%2Balba

Kemble, J. (2022, August 8). Rejuvenating okra: Producing two crops from one planting. Alabama

Cooperative Extension. Retrieved August 15, 2022, from https://www.aces.edu/blog/topics/lawn-garden/rejuvenating-okra-producing-a-spring-crop-and-a-bigger-fall-crop-from-the-same-planting/

Oregon State University. (2019, October 1). Okra. Oregon State University College of Agricultural Sciences. Retrieved August 15, 2022, from https://horticulture.oregonstate.edu/oregon-vegetables/okra-0#:~:text=TEMPERATURE%20REQUIREMENTS,for%20germination%20is%2060%20F

Parkell, N. B., Hochmuth, R. C., & Laughlin, W. L. (2016, April 24). Leafy greens in hydroponics and protected culture for Florida. IFAS Extension. Retrieved August 15, 2022, from https://edis.ifas.ufl.edu/publication/hs1279

Pothour, G. (2014, February). Growing sweet potatoes in the Sacramento area. Sacramento ; University of California Cooperative Extension – Sacramento Country.

Qiu, Y., & Liu, G. (2020, September 8). Florida cultivation guide for malabar spinach. IFAS Extension. Retrieved August 15, 2022, from https://edis.ifas.ufl.edu/publication/HS1371

Schumaker, P. (2019, June 11). Southern peas โ€“ a summer vegetable and a cover crop. UF/IFAS Extension Charlotte County. Retrieved August 15, 2022, from https://blogs.ifas.ufl.edu/charlotteco/2019/06/11/southern-peas-a-summer-vegetable-and-a-cover-crop/

Smith, P., & Shaughnessy, D. (2003, April 23). Southern peas. Clemson Cooperative Extension Home & Garden Information Center. Retrieved August 15, 2022, from https://hgic.clemson.edu/factsheet/southern-peas/

Smith, P., Polomski, R. F., Shaughnessy, D., & Snipes, Z. (2020, January 14). Okra. Clemson Cooperative Extension Home & Garden Information Center. Retrieved August 15, 2022, from https://hgic.clemson.edu/factsheet/okra/

Do you have a favorite Hot Weather Crop? Share your hot weather gardening success below!

Unusual Edibles for Your Front Yard Garden

Make your front yard garden beautiful so neighbors can enjoy it too.

There are many factors to consider when picking your plants each growing season. One factor you might have to deal with โ€ฆ does your neighborhood allow front yard gardens?

Here’s your chance to get inspired by some unusual yet stealth edibles.

How about adding some garlic?
Complimentary eGuide: Your guide to growing, harvesting & curing delicious garlic

What do you grow in your front yard garden? Let us know in the comments below.

6 Keys to Hot Weather Gardening

If you live in a climate where summer temperatures regularly exceed 90ยฐF, hot weather gardening can be a challenge. Above 95ยฐF, tomato blossom drop can happen, and summer favorites like cucumbers, sweet peppers, and eggplant slow production and become more vulnerable to pests and disease.

The good news is you can take steps to protect your plants and your harvests.

Gathering some information will help you be successful in hot weather gardening:

๐Ÿ”ฅ Your areaโ€™s average high temperatures

๐Ÿ”ฅ When you can expect the heat to strike

๐Ÿ”ฅ What temperatures your crops need to thrive

Not sure how hot it gets in your area? You can use Weather Undergroundโ€™s โ€œHistorical Weatherโ€ section to learn about weather trends in your area.

All vegetable crops have a temperature sweet spot that supports maximum growth and productivity.

Cool season vegetables are generally leaf and root vegetables that thrive in temperatures between 50 and 70ยฐF. Many can withstand frost, but they slow production and eventually bolt as temperatures climb.

Hot weather crops bear fruit (we call many of them โ€œvegetablesโ€). Summer favorites like tomatoes, peppers, summer squash, mellons, and beans thrive in temperatures between 80 and 90ยฐF. If your high temperatures rarely go above 95ยฐF, you just need to make sure your plants are healthy and watered.

However, if you live in an area that regularly sees temperatures above 95ยฐF, keeping crops cool is key.

Hot weather gardening can be challenging, but just a few measures can keep your plants happy and productive:

  1. Choose crops that can handle the heat. Sweet potatoes, okra, melons, hot peppers, southern peas, and malabar spinach are all great options for hot areas.
  2. Make sure your watering is consistent. Irregular or insufficient watering can stress your plants and make them less resilient in the heat. Sufficient water helps your plants stay healthy and withstand heat.
  3. Provide lots of organic matter with compost. Abundant soil life protects your plants from diseases and makes them more resilient to stress. Soil with high levels of organic matter also holds water better, so you donโ€™t risk losing as much moisture when things heat up.
  4. Interplant to create natural shade in the hottest part of the day. If you orient your garden beds facing West, you can plant tall, heat-loving crops โ€œin frontโ€ of other crops to provide shade. Okra grows large with big, broad leavesโ€“like a natural sun canopy that also feeds you!
  5. Space your plants further apart. Biointensive planting has many benefits. But when things heat up, closely spaced plants have to compete more for water and air circulation. Just like you donโ€™t want a long hug on a hot summer day, your plants need a little room to breathe.
  6. Try shade cloth. Shade cloth comes in a variety of densities that provide more or less shade depending on your plantsโ€™ needs.

Solving your unique climate and space puzzle takes time, research, and experimentation. Making observations and taking good notes this year can help your garden grow even more next year. And weโ€™re happy to help you learn more along the way!

Join us for our summer series of blogs all about hot weather gardening for bountiful harvests.

Amy Davis
Wordsmith and Client Support

In an age of increasing specialization, Amy proudly calls herself a generalist. She holds a Masterโ€™s degree in English, a RYT 200 yoga teacher certification, and is working her way through a bachelorโ€™s in Biology. She believes in nurturing and following curiosity, then taking what youโ€™ve learned and sharing it to better the lives of others.

Amy is an avid chaos gardener and has worked in agriculture for several years. In 2017, she first apprenticed on a Certified Organic vegetable farm and later took over as operations manager there. She also served as greenhouse manager for a local restaurantโ€™s urban farm, and she spent a year in AmeriCorps service to an agriculture nonprofit specializing in education for beginning farmers and gardeners. She has a passion for greenhouse work, and she loves watching tiny little seedlings grow and turn into lunch. Amy and her husband grow an ever-evolving front yard garden in southern Appalachia (apple-atcha).ย ย 

Are you experiencing hot weather? Share your hot weather tips in the comment section below!

Kidsโ€™ Read-Aloud: Dandelion Magic

So many grownups think dandelions are weeds. They mow them down, spray them, and gripe about them all spring.

But did you know dandelions can actually beโ€ฆMAGIC?? Dandelions are the first food honeybees eat each year. And because they have a taproot, dandelions loosen hard soil and bring deep-down nutrients, like calcium, to the soil surface for other plants to use. Dandelions have tons of health benefits for you, too!

Join our Youth Garden Instructor, Meg Groves, as she reads Dandelion Magic by Darren Ferrell. Dandelion Magicย is an interactive story about a little boy named Jonah, one magical dandelion, and a wish that gets a little out of hand.

Jonahโ€™s Nana tells him that there is a very special dandelion that grows once a year. If you find the magical dandelion, make a wish, and blow its seeds, your wish will come true! Nana found it once herself, so she knows all about it.

Jonah finds the magical dandelion, and he wishes to become a pirate! But being a pirate comes with LOTS of unexpected challenges. Just when he finds treasure, sea monsters appear everywhere. Jonah needs your help to scare them off and get back home.

How can you help? Roaring, making faces, and blowing raspberries! This interactive story will work those dandelion-blowing muscles, even if theyโ€™re not blooming where you are right now.

When you blow the dandelion seeds off of the stem, the wind takes the seeds far and wide. If the seeds land in a place where itโ€™s good to grow, theyโ€™ll grow into more dandelion flowers! More dandelions will feed even more bees and improve more soil.

With so many reasons to love dandelions, letโ€™s stop all this โ€œweedsโ€ business. Pick a dandelion, make a wish, and send the seeds out on your own breath! Maybe youโ€™ll make a little magic ๐ŸŒฌ๏ธ

This article contains links to a product that we are a referral partner for. If you click and take action, Grow Your Own Vegetables LLC may be compensated. We only recommend products that we love and that we know can be helpful to you as a gardener.

Do you have a favorite ‘Garden Story’? Comment below.

Regenerative Soil Microscopy: the Book, Course, & Database

Matt Powers
The Permaculture Student

{2022 Superfood Garden Summit Presenter}

Matt Powers teaches permaculture and regenerative gardening and farming to families, youth, schools, and adults all over the world through his online courses, videos, and books. Matt provides daily inspirational and regenerative content online and is one of the most-followed permaculture teachers online.

How do we truly tell good compost from bad compost? Or better from best? BECAUSE in life, we are always after what is BEST.

What about you?

  • Do you want to KNOW whatโ€™s in your soil or compost before you apply it?
  • Do you want to be able to test your soil, compost, mushrooms, roots, and more at home?
  • Would you like to see other peopleโ€™s test results in comparison to your own? What about in comparison to other bioregions and climate analogs?

Matt Powers has a new book, course, and database project that is absolutely WILD – it’s going to change soil science as we know it!

By having a way for everyone to compare their soils, the best soil regeneration and management practices will be revealed transparently, publicly, and powerfully!!

This is a game-changer – if you ever wanted to know how your soil or compost compares to others in your bioregion or in the world, this is how we are going to do it. Matt’s cracked the code: he’s developed a holistic approach to soil science with Regenerative Soil first and now with Regenerative Soil Microscopy & the new R-Soil Database, there’s a way to unlock the secrets of the soil for all the see for the first time EVER.

This is such an incredibly important project: it will change all farming, horticulture, ranching, gardening, and food as it rolls forward and shows the pathways to the highest nutrient density. Folks will be able to compare across 100+ points of distinction like organic matter %, BRIX of the plant sap, pH, all macro & micronutrients, paramagnetism, REDOX, CEC, Salinity, Compaction, Plant Sap Analysis, and so much more – compare your own samples over time or against the bioregion, world, or across specific variables like pH… the possibilities for deeper insight are limitless!!

This opens the door to a new way of testing, researching, discovering, sharing, learning, and growing.

THANK YOU MATT!!

Please show your appreciation by supporting Matt’s Kickstarter campaign in any way that you can – please share it with your people: this is for the folks that LOVE composting and soil & for those serious about growing, so please share it with everyone you can so we can find those folks to participate in this project. It’s going to help everyone as it develops and grows!

Check out what Matt is offering in his 7th Kickstarter!!
(Already 105% funded!!)

Did you check out Matt’s Video and New Book? Share with us your take-a-ways from his teaching.