Getting Started Growing Your Own Vegetable and Herb Seedlings

Seedlings are the baby plants you see at the nurseries, ready to be transplanted into your garden. But you might want to grow your own instead. While there are many benefits of starting your own vegetable and herb plants from seeds, there is one BIG reason why you might consider purchasing instead. Here are the most important considerations for growing seedlings at home. 

Benefits to growing your own:

  1. You know exactly how the seedlings were grown. Ensure your plants are grown organically without any toxic chemicals entering your garden. When purchasing, ask whether plants have been treated. 
  2. You ensure your plants immunity is high for a healthy life. Temperatures and conditions are important to baby plants, and stress at a young age can cause transplant shock or a weak plant that doesn’t yield well. Sometimes you bring home a seedling, plant it, and it dies. And you’re not sure if it’s something you did. But it could just be a plant that wasn’t cared for properly.
  3. You have complete control of when you put plants in the ground. When purchasing transplants, you are relying on what’s available at the stores. And what you want is not always there when you need it. Growing your own means you can plan ahead for your most abundant harvest.
  4. You have access to hundreds of varieties of vegetables. There are so many varieties of mustard greens and tomatoes on the planet that nobody could even tell you how many there are. And that’s true of most vegetables. Choose exciting varieties for flavor, yield,  and what grows well in your climate. 
  5. You save money. Once you get the hang of growing HEALTHY plants and you have all the supplies, you will save money. However, the first few years, planting your own can actually be more expensive than buying transplants. This is the one BIG reason you may want to purchase instead.

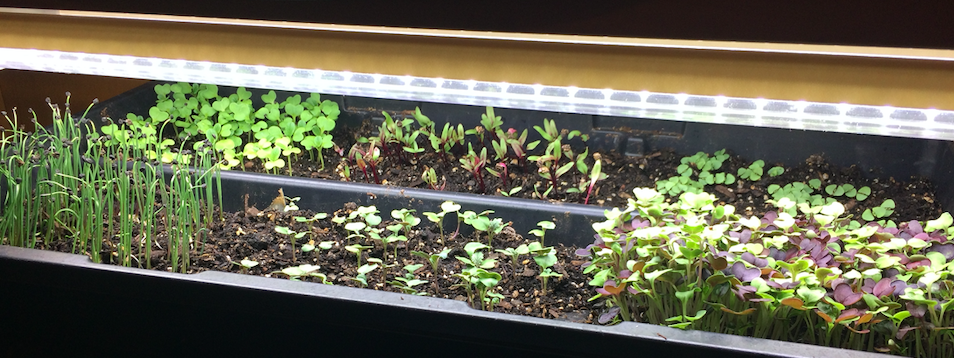
Three garden supplies essential to growing your own seedlings

You’ll need 1) growing medium (not soil), 2) containers to put it in, and 3) grow lamps if you’re growing indoors. We’ll focus on containers in this article. But real quick, our favorite growing medium is Fox Farm Ocean Forest Potting Mix. It’s got everything your plants need in one bag, from earthworm castings, bat guano, sea-going fish & crab meal to forest humus and moss. This mix will not disappoint!   Click here to get it on Amazon. And here is a bulk order option

This article is too short to include recipes for making your own mix. A couple key ingredients to include are perlite, vermiculite, peat moss or Canna Coconut Coir and Wiggle Worm – Worm Castings. For small gardens, choose the 4.5-pound size. For larger gardens, choose the bulk 30-pound option.

This is not a complete list, just some of our favorites to get you started.

Reusable Containers for Starting Vegetable and Herb Seeds


Generally, plastic trays are flimsy and end up in the landfill after just one or two uses. However, one farm is changing all that and helping to redefine our relationship to the Earth. Bootstrap Farmer offers durable trays with a one-year warranty against warping and breakage… that’s amazing! Clean trays between use to prevent disease spread.

These are the best, longest-lasting trays on the market. And they have different cell sizes available. Get cells for smaller varieties like lettuces here and get larger six cells for your larger transplants like tomatoes and cucumbers here.

Containers You Plant Right in the Ground

Avoiding plastic altogether? Consider Fertilpots over at Arbico Organics, which compost right into your soil. Plant the whole thing in your garden and avoid any transplant shock from handling the plant. Unlike many similar compostable products, they are OMRI-listed meaning the ingredients have been tracked as organic. Fertilpots are breathable and help prevent roots from getting root-bound, too. However, the downside is that you have to keep buying more.

“Soil Blocking” Eliminates the Need for Containers

Soil blocking is a process where you press your growing medium together into squares that hold together without the need for containers. Once you have the right equipment for this process, you never have to buy containers ever again. However, you do have a higher initial investment to get started.

There are benefits to this method: no cleaning trays, conserving growing medium, and providing optimal root health. How to soil block effectively is a topic of another post. NOTE: You’ll need to mix your own special growing medium (not one that you can buy at a big-box store), and a bit of time to get used to the process. 

Soil blockers are for anyone who wants to get away from plastic, has a little extra time and money, wants the healthiest seedlings and plans to garden long-term. 

20-Cell Soil Blockers come in a handheld and stand-up  versions. The stand-up soil blocker is much easier on your wrists, shoulders and back. 4” Soil Blockers are the largest blocker available and are perfect for your larger transplants like tomatoes, gourds, cucumbers, eggplant, etc.

How do you make your garden decisions?

Ultimately, there are many garden choices you will make. Some questions to consider: What do you really have time for? What feels like the best environmental choice for you? And what amount of investment feels good right now? Whatever suits you and your lifestyle is the right choice for you. And that goes for making decisions about seed starting at home, too.  

Check out our Seeds Micro Course!

In this course, you’ll find resources for buying seeds that reflect your values, starting successful seedlings, and saving seeds–make gardening everything you need and want it to be!

Seeds Micro Course Graphic

Not Ready to Grow Yet?

Check out our Free Guide on Types of Seeds

In this guide, you’ll learn

Types of Seed Quick Guide TINY
NOTE:  This article contains affiliate links and Grow Your Own Vegetables, LLC may be compensated when you click and purchase through the links above. By purchasing through these links, you’re supporting our mission to help green the planet and create food stable communities across the globe. We only recommend products we LOVE and that help growers on their quest for a fresh food lifestyle.

Delicious Microgreens Recipes!

Have you ever considered how a tiny garnish can transform your meals? Microgreens are not only bursting with nutrients; Plus, they’re also a delightful way to enhance the taste and visual appeal of your dishes. Let’s delve into some tantalizing delicious microgreens recipes!

Microgreens 101: A Charcuterie Adventure

Delicious Microgreens Recipes! Charcuterie

Imagine a canvas of flavors and textures awaiting your creativity. A charcuterie board with microgreens lets you play with taste in ways you might not have considered. Firstly, lay out an array of sweet fruits and jams. Then add tangy pickles and citrus. Be sure to include salty cheeses and nuts.

Pair your charcuterie board with a bitter or spicy microgreen to balance. Specifically, microgreen varieties like kale, purple kohlrabi, mustard, and radish make superb choices. Dive in and let each bite be an exploration of flavors!

Perfect Pairings: Roasted Soup and Microgreens

Delicious Microgreens Recipes! Soup Ingredients

Who knew that the secret to elevating a warm bowl of roasted butternut squash and poblano pepper soup could be a handful of microgreens? The answer lies in their crisp nature, contrasting the soup’s velvety texture. Drizzle olive oil and squeeze lime for an extra layer of flavor. You’ll be surprised at how something so simple can make such a profound difference to your taste buds.

Summer in a Bowl: Melon and Sweet Pepper Salad

Delicious Microgreens Recipes! Melon and Sweet Pepper Salad with Microgreens and Hazelnuts

As the sun blesses us with its warmth, there’s no better way to celebrate than with a refreshing melon and sweet pepper salad. The microgreens add a crisp, refreshing touch that perfectly complements the sweetness of melon and the subtle savoriness of hazelnuts. It’s a dance of flavors and textures that will have you craving for more with every forkful.

Creative Combos: Your Microgreens Journey

You’re now equipped with a few ideas to get started; moreover, the true joy of microgreens lies in their versatility. Don’t hesitate to experiment; find your perfect combo for your delicious microgreen recipes. Add them to your sandwiches, pizzas, or even smoothies. The possibilities are endless and so are the health benefits.

Embracing microgreens in your cooking is not just about a trendy ingredient; indeed, it’s about discovering new dimensions of taste and nutrition in your daily meals. Whether you’re a seasoned chef or a curious foodie, microgreens have something to offer. So go ahead, sprinkle a little green on your next dish and watch it come alive. Bon Appétit!

Want to grow your own microgreens at home?

It’s Easy!

Get Your Complimentary Guide to Growing 6 Easy-to-Grow Microgreen Varieties

Guide to 6 Easy to Grow Microgeens

Mastering Microgreen Planting Techniques

Unlike your typical garden vegetables, microgreens are planted closer together and therefore require a slightly different planting approach. These nutritious and delicious mini-plants can easily give you high-yield harvests, even in the smallest of spaces. However, if you don’t plant them correctly, you risk losing entire trays to mold or bacteria. You can avoid such disappointment by learning the right way to plant each variety. Start mastering microgreen planting techniques now.

Large Seed Microgreen Planting Techniques

Strategies for Planting - Different Micros

When you’re working with larger seeds like tetragonia or sunflower, beware of mold. These seeds easily touch one another, and their discarded husks are a potential breeding ground for bad bacteria. To combat this, you need a deft touch. Start by spreading the seeds evenly across your growing tray. Then, sprinkle a light layer of substrate over the seeds. This simple step can significantly reduce the risk of mold and ensure your microgreens grow healthily.

Tiny Seeds: Sowing for Success

Smaller seeds, such as amaranth, will look more sparse in the tray making it easier to accidentally over seed the tray. Covering these seeds can spell doom for your harvest as these tiny sprouts struggle to break through. To avoid this, gently press the substrate. Then, sow your small seed microgreen varieties directly on top of the substrate. Gently press them down without burying them, allowing their delicate roots to anchor. By resisting the urge to cover them, you provide the perfect conditions for their rapid growth.

Needle-Like Seeds: The Pinch Perfect Method

Microgreens with seeds shaped like needles, like marigold gem, need precision planting. Scatter the seeds as evenly as possible into non-pressed substrate. Next, lightly pinch the seeds into the soil to prevent clustering and provide them with enough substrate to root into without being entirely covered. This method ensures that each seed has adequate space and resources to grow into a healthy, robust microgreen.

By understanding the specific needs of each type of microgreen seed, you can maximize your harvest and enjoy these nutrient powerhouses in your salads, sandwiches, and garnishes. Remember, successful microgreen planting isn’t just about sowing seeds; it’s about sowing them right.

Start Mastering Your Microgreen Planting Techniques

Learn seed amounts, get growing notes, and discover the days to germination, days under the lights, and days to harvest

Microgreen Variety Chart Opt In TINY

What’s you’re favorite microgreen variety?

Keep Your Garden Plentiful with a Well-Designed Crop Plan

One of the most common occurrences with gardeners is that they leave a massive amount of space empty in their gardens every year. This happens with new and seasoned growers alike. All that empty space means you’re not getting the best return on your investment…and it’s not for lack of planning. Keep your garden plentiful with a well-designed crop plan.

Dedicated growers will spend hours and hours trying to create a solid garden plan only to discover midseason that there is a lot of unused space. That unused space isn’t just a strike against your time, money, and effort. It’s also not ideal for your soil. Soil is precious, and seasoned growers know—gardeners grow soil, not plants.

The best thing you can do for you and your garden is to learn how to maximize your harvest yields by using every square inch of space. To do that, you need one thing: a solid crop plan.

However, this is what most growers create for a crop plan, and it isn’t a crop plan at all:

The Difference Between a Crop Plan and A Garden Map

This is a garden map. The difference between a garden map and a crop plan is that a crop plan is like a video of your entire growing season and a garden map represents one frame of that video. The garden map you see above is one moment in time. The crop plan is the chart of all the points in time that something big needs to happen in your garden.

That doesn’t mean a garden map is useless. In fact, garden maps can help us understand and calculate proper plant spacing. It’s just that it alone cannot maximize your yields.

Once you begin building a crop plan that charts your entire season and creating garden maps during key points in time, you’ll not only see how many plants you can get in at one time. You’ll also see how many successions you can grow. This word throws a lot of new growers off, and it’s often confused with crop rotation. Even the definition of succession in farming is confusing for a lot of new growers so I’ve found it best to create the definition using an example. 

The Difference Between Succession & Crop Rotation

So what is a succession? Let’s say you are planting a smaller variety of radish in your garden starting in March and let’s say your climate lets you grow them all the way until the end of May. That’s three months or roughly 90 days. But the small radishes typically only take about 28-35 days to mature.

So you plant in March and then in April you’ve harvested. Instead of leaving that space bare for the next two months, you’ll plant another round of radishes in April and another in May. That’s three total. These ‘rounds’ are the successions, and a properly done crop plan gives you the insight into how many successions you can get from a given crop.

Crop rotation is something entirely different. Crop rotation basically means that if you plant your cucumbers in bed 1 this year, you don’t plant them or any other members of that plant family in that bed again next year. In fact, your crop rotation should be on a four year cycle. So ideally, you’ll have four garden beds.

Crop rotation helps keep our gardens healthy in a number of different ways. The first is that crops have varying nutritional requirements. So let’s say, for example, that you always plant corn in the same place. Corn is notorious for being a heavy nitrogen feeder, so over time, the soil you plant your corn in will be depleted of nitrogen. By rotating the crops, you’re helping to keep your soil nutrients levels more in balance.

Using Crop Rotation In Small Gardens

But what if you only have two garden beds? That’s okay. The goal would then be to subdivide the beds into two so you have four equal parts. You’ll plant the cucumbers in the first section of bed 1 the first year, the second section of bed 1 the second year, then move to the second bed the third and fourth year, cutting that bed in two sections as well.

Crop rotation also helps suppress pests and diseases. If you plant tomatoes in the same place every year, those tomato hornworms are going to know exactly where to go to get their next meal. By planting them somewhere new each year, you’re making those pests and diseases work that much harder to get your food.

Create A Crop Plan For Garden Success

With a well designed crop plan, you can easily rotate your crops without having to redo your crop plan every year and recalculate how many plants and seeds you’re going to need. To learn more on creating a well designed crop plan, check out the Beginner Crop Planning Micro Course. 

Herbs for Preservation: Freeze or Dry?

Herbs are the essence of flavor in many dishes, and preserving them allows you to enjoy their freshness long after the growing season. You might be pondering the best way to preserve your herb harvest. Should you freeze or dry herbs for preservation? Let’s delve into the pros and cons so you can decide which suits your culinary needs and lifestyle.

Freezing in Ice Cubes: Flavorful and Fresh

Herbs Hanging TINY Unveil the Wonders of Making Herbal Vinegars

Locking in Freshness

Freezing herbs in ice cubes is like hitting the pause button on their freshness! Simply chop your herbs and place them in an ice cube tray Then, cover with water, broth, oil, or butter, and freeze. When you’re ready to cook, pop out a cube and add it directly to your food or beverage. This method is particularly great for herbs like basil, chives, and cilantro that lose their vibrant flavor when dried.

Freezing herbs doesn’t require a lot of room. Once frozen, transfer the cubes to a bag or container for compact storage (this is perfect if you have a small kitchen or limited shelf space).

The downside is that thawed herbs won’t have the same crisp texture as fresh ones, making them less suitable for garnishes and won’t have the same texture. Also, be mindful of freezer burn and power outages which could compromise your frozen herb supply.

Herbs Hanging TINY Unveil the Wonders of Making Herbal Vinegars

Drying: The Traditional Twist

Drying herbs is a time-honored tradition that extends their usability for months, sometimes even years. After drying, store your herbs in an airtight container in a cool, dark place to maintain their potency. This method is ideal for herbs like rosemary, thyme, and oregano, which retain their flavor well when dried.

Drying herbs can be as simple as hanging them upside down in a well-ventilated area. No special equipment is necessary unless you opt for a dehydrator or oven, making it a more energy-efficient method than freezing.

Drying can be a slower process, taking days to weeks, and not all herbs dry well. Plus, the intensity of flavor can diminish over time, and some nuanced flavors may not be as pronounced as they are in their fresh or frozen counterparts.

Making Your Choice

Whether you should freeze or dry herbs for preservation is a personal choice that depends on your preferences and how you like to cook and enjoy herbs. If you love the fresh taste of herbs and regularly use them in cooking, freezing may be the way to go. On the other hand, if you prefer having a stash of herbs on hand for a longer period or enjoy making your own spice blends, drying could be your best bet.

Ultimately, you don’t have to choose just one method! Why not experiment with both? Freeze some of your harvest for that fresh herb taste in soups and stews during winter, and dry others for seasonings and rubs. Whichever method you choose, you’ll extend the life of your herbs and add a homegrown touch to your meals all year round.

Want to learn more about food preservation?

Join the 3 Strategies to Simplify Preserving & Storing the Harvest Masterclass

so you can enjoy fresh food all year long!

Preserve Masterclass: TINY Herb Preservation: Freeze or Dry?